Getting Started
Note: We built and run the examples below under OS Ubuntu 18.04.5 LTS with cmake version 3.10.2.
Note: Refer to Kneron PLUS Introduction for feature details
1. Introduction
In this document, we will introduce Kneron PLUS (Platform Library Unified Software) framework to demonstrate the usage of Kneron AI device from host software. When referring to a complete AI application development, actually three parts are involved:
- model development
- software development
- firmware development
This Getting Started document only focuses on host software usage with the AI device to perform following functionality.
- How to upgrade the AI device to KDP2 firmware loader.
- How to build the software package
- How to run the APP Yolo inference example.
For model development, please refer the Toolchain Docker part.
For firmware development, please refer the documents in Customized API.
2. Upgrade AI Device to KDP2 Firmware
Note: For the Windows users, please refer Install Dependency for the installation of the driver.
Note: For details, please refer Upgrade AI Device to KDP2 Firmware.
Before running PLUS examples, users need to make the AI device running with the KDP2 firmware.
Download the KneronDFUT_ubuntu.zip into Ubuntu in from https://www.kneron.com/tw/support/developers/. It is located at Kneron PLUS section.
$ unzip KneronDFUT_ubuntu.zip
$ cd Kneron_DFUT/
$ chmod +x bin/KneronDFUT # optional
Use Command Line
$ sudo sh KneronDFUT.sh --help[Display help message]
--help : [no argument] help message
[Scan and list all information]
--list : [no argument] list all dongles information
[Update dongles to usb boot] (Only works for KL520)
--kl520-usb-boot : [no argument] choose update to Usb Boot
--port : [argument required] port id set ("all" or specified multiple port ids "13,537")
[Update dongles to flash boot] (Only works for KL520)
--kl520-flash-boot : [no argument] choose update to Flash Boot
--port : [argument required] port id set ("all" or specified multiple port ids "13,537")
--scpu : [argument required] self pointed scpu firmware file path (.bin)
--ncpu : [argument required] self pointed ncpu firmware file path (.bin)
[Update dongles to usb boot] (Only works for KL630)
--kl630-usb-boot : [no argument] choose update to Usb Boot
--port : [argument required] port id set ("all" or specified multiple port ids "13,537")
[Update dongles to usb boot] (Only works for KL630)
--kl630-flash-boot : [no argument] choose update to Flash Boot
--port : [argument required] port id set ("all" or specified multiple port ids "13,537")
--scpu : [argument required] self pointed firmware file path (.tar)
[Update dongles to usb boot] (Only works for KL730)
--kl730-usb-boot : [no argument] choose update to Usb Boot
--port : [argument required] port id set ("all" or specified multiple port ids "13,537")
[Update dongles to usb boot] (Only works for KL730)
--kl730-flash-boot : [no argument] choose update to Flash Boot
--port : [argument required] port id set ("all" or specified multiple port ids "13,537")
--scpu : [argument required] self pointed firmware file path (.tar)
[Update firmware file to flash memory in dongles] (Only works for KL720)
--kl720-update : [no argument] choose write firmware to flash memory
--port : [argument required] port id set ("all" or specified multiple port ids "13,537")
--scpu : [argument required] self pointed scpu firmware file path (.bin)
--ncpu : [argument required] self pointed ncpu firmware file path (.bin)
[Update model file to flash memory in dongles]
--model-to-flash : [argument required] self pointed model file path (.nef)
--type : [argument required] type of device ("KL520", "KL630", "KL720", or "KL730")
--port : [argument required] port id set ("all" or specified multiple port ids "13,537")
[Enable Graphic User Interface]
--gui : [no argument] display GUI
[Get Current Kneron DFUT Version]
--version : [no argument] display the version of Kneron DFUT2.1 KL520
-
Use GUI to Update AI Device
$ sudo sh KneronDFUT.sh-
Select the AI device to be update to KDP2 firmware
-
Push Run button (Update to USB Boot should be checked by default)
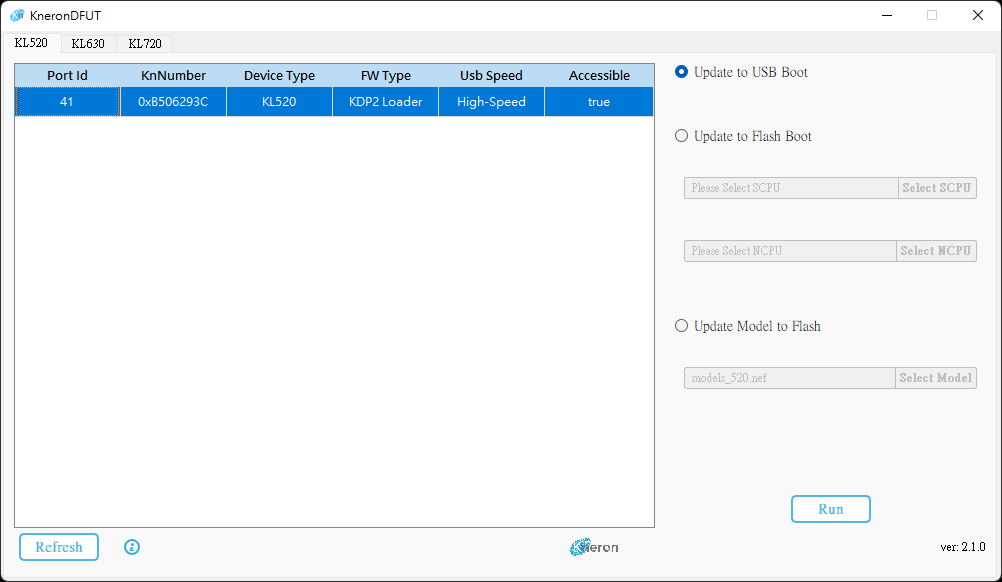
-
-
Use Command Line to Update AI Device
$ sudo sh KneronDFUT.sh --list=========================================== Index: 1 Port Id: 133 Kn Number: 0x270A265C Device Type: KL520 FW Type: KDP Usb Speed: High-Speed Connectable: true ===========================================$ sudo sh KneronDFUT.sh --kl520-usb-boot --port 133Start Update Device with Port Id 133 to USB Boot ==== Update of Device with Port Id: 133 Succeeded ====
2.2 KL630
-
Use GUI to Update AI Device
$ sudo sh KneronDFUT.sh-
Select the AI device to be update to KDP2 firmware
-
Push Run button (Update to USB Boot should be checked by default)
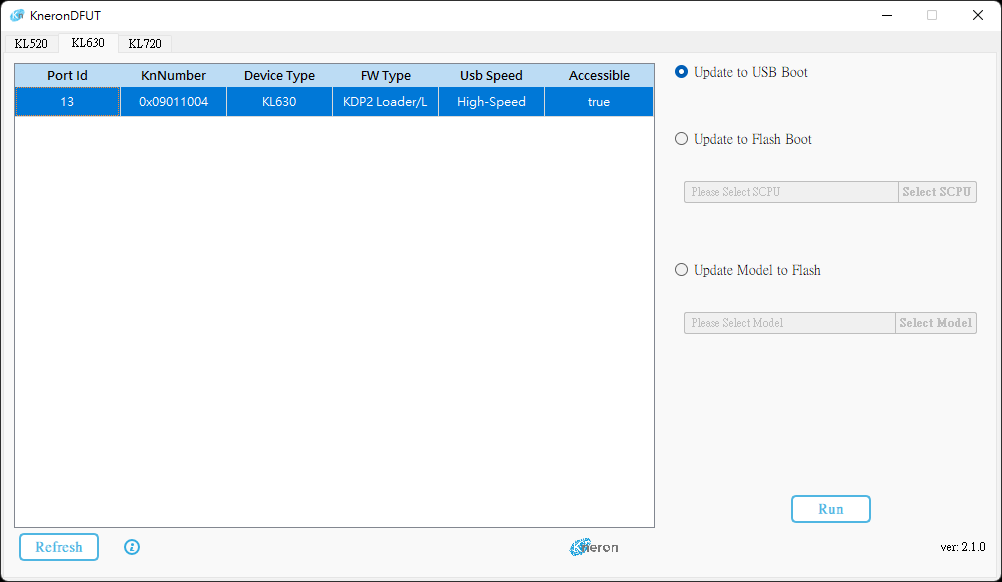
-
-
Use Command Line to Update AI Device
$ sudo sh KneronDFUT.sh --list=========================================== Index: 1 Port Id: 13 Kn Number: 0x09011004 Device Type: KL630 FW Type: KDP2 Usb Speed: High-Speed Connectable: true ===========================================$ sudo sh KneronDFUT.sh --kl630-usb-boot --port 13Start Update Device with Port Id 13 to USB Boot ==== Update of Device with Port Id: 13 Succeeded ====
2.3 KL720
-
Use GUI to Update AI Device
$ sudo sh KneronDFUT.sh-
Select KL720 Tab.
-
Select the KL720 devices to be update to KDP2 firmware.
-
Select Update Firmware to Flash
-
Manually choose SCPU firmware file and NCPU firmware file.
- The firmware files can be found in ${PLUS_FOLDER}/res/firmware/KL720/
-
Push Run button.
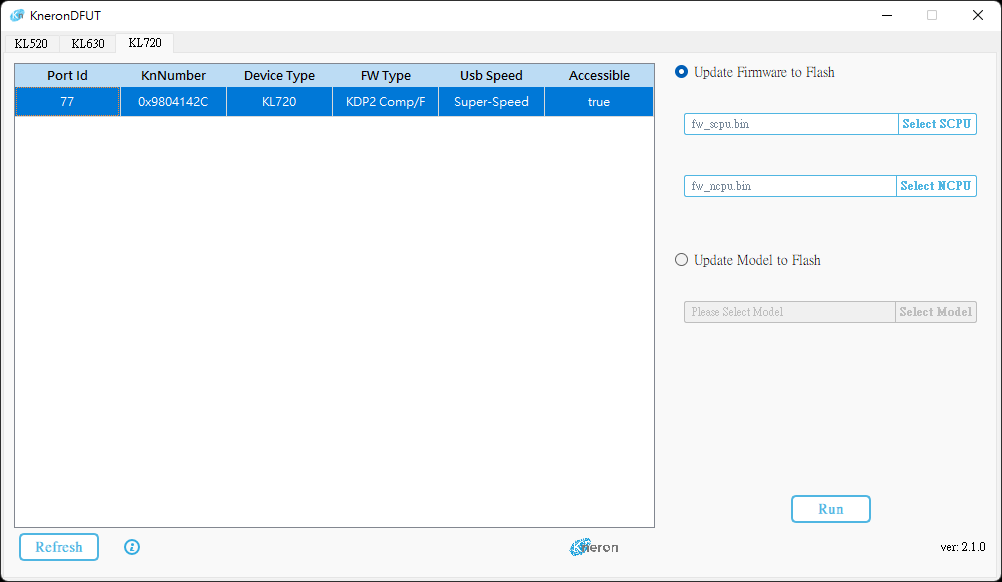
-
-
Use Command Line to Update AI Device
$ sudo sh KneronDFUT.sh --list=========================================== Index: 1 Port Id: 262 Kn Number: 0x2004142C Device Type: KL720 FW Type: KDP Usb Speed: Super-Speed Connectable: true ===========================================$ sudo sh KneronDFUT.sh --kl720-update --port 262 --scpu ${SCPU_FILE_PATH} --ncpu ${NCPU_FILE_PATH}Start Update Firmware to Device with Port Id 262 ==== Update Firmware to Device with Port Id: 262 Succeeded ====
2.4 KL730
-
Use GUI to Update AI Device
$ sudo sh KneronDFUT.sh-
Select the AI device to be update to KDP2 firmware
-
Push Run button (Update to USB Boot should be checked by default)
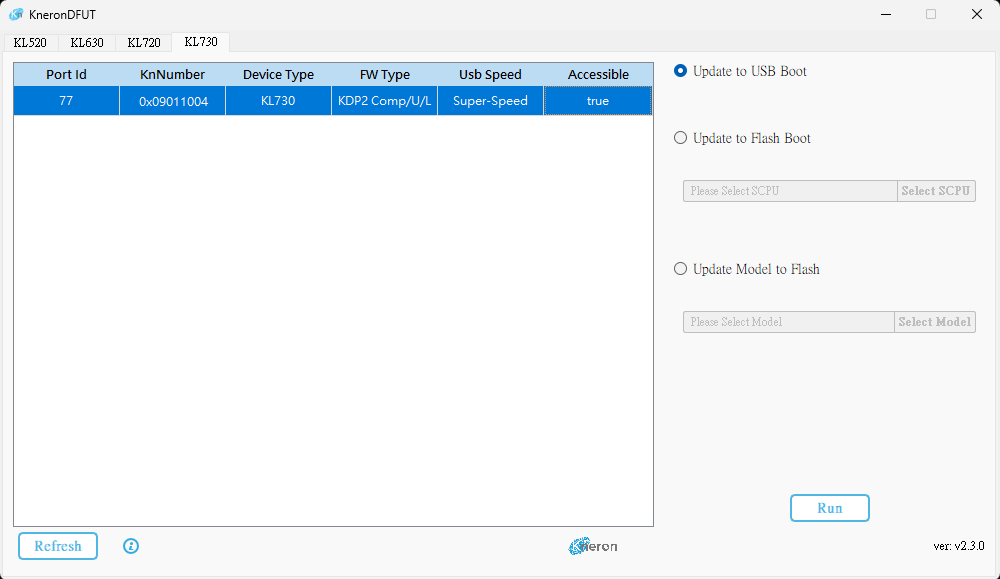
-
-
Use Command Line to Update AI Device
$ sudo sh KneronDFUT.sh --list=========================================== Index: 1 Port Id: 13 Kn Number: 0x19611034 Device Type: KL730 FW Type: KDP2 Usb Speed: Super-Speed Connectable: true ===========================================$ sudo sh KneronDFUT.sh --kl730-usb-boot --port 13Start Update Device with Port Id 13 to USB Boot ==== Update of Device with Port Id: 13 Succeeded ====
3. Build PLUS
3.1 Ubuntu
-
Before building code, some build tools and packages must be set up for the first time. Please refer Install Depedency
-
Download the latest kneron_plus_vXXX.zip into Ubuntu from https://www.kneron.com/tw/support/developers/. It is located at Kneron PLUS section.
-
Decompress the kneron_plus_vXXX.zip.
$ unzip kneron_plus_vX.X.X.zip -
Build code.
Note: if you also want to build OpenCV examples at this moment, please adjust cmake command as following$ cd kneron_plus/ $ mkdir build $ cd build/ $ cmake .. $ make -j$ cmake -DWITH_OPENCV=ON ..
Once build is done, the libkplus.so and example executables will be in build/bin/
Check if PLUS examples are built successfully.
$ ls bin/

    kl520_demo_customize_inf_multiple_models
    kl520_demo_customize_inf_single_model
    kl520_demo_generic_image_inference
    ...
3.2 Windows
-
Before building code, some build tools and packages must be set up for the first time. Please refer Install Dependency
-
Download the latest kneron_plus_vXXX.zip into Windows from https://www.kneron.com/tw/support/developers/. It is located at Kneron PLUS section.
-
Decompress the kneron_plus_vXXX.zip.
-
Build PLUS in MSYS2 MinGW 64-bit
Note: To execute MSYS2 MinGW 64-bit, please use the shortcut or
c:\msys64\msys2_shell.cmd -mingw64instead ofc:\msys64\mingw64.exe.
Note: if you also want to build OpenCV examples at this moment, please adjust cmake command as following$ cd ${PLUS_FOLDER_PATH} $ mkdir build $ cd build $ cmake .. -G"MSYS Makefiles" $ make -j$ cmake -DWITH_OPENCV=ON .. -G"MSYS Makefiles"Note: Some examples may cause warnings during cmake process due to the length of the paths. You can rename these examples to shorter names to avoid these warnings.
Once build is done, the libkplus.so and example executables will be in build/bin/
Check if PLUS examples are built successfully in MSYS2 MinGW 64-bit.
$ ls bin/

    kl520_demo_app_yolo_inference
    kl520_demo_app_yolo_inference_multithread
    kl520_demo_customize_inf_multiple_models
    kl520_demo_customize_inf_single_model
    kl520_demo_generic_image_inference
    ...
4. Run Generic Image Inference With Post-process
Note: If you are using Windows, please run example in MSYS2 MinGW 64-bit.
Note: To execute MSYS2 MinGW 64-bit, please use the shortcut or c:\msys64\msys2_shell.cmd -mingw64 instead of c:\msys64\mingw64.exe.
4.1 KL520
$ sudo ./kl520_demo_generic_image_inference_post_yoloconnect device ... OK
upload firmware ... OK
upload model ... OK
read image ... OK
starting inference loop 100 times:
.......................................
detectable class count : 80
box count : 5
Box 0 (x1, y1, x2, y2, score, class) = 45.0, 57.0, 93.0, 196.0, 0.965018, 0
Box 1 (x1, y1, x2, y2, score, class) = 43.0, 95.0, 100.0, 211.0, 0.465116, 1
Box 2 (x1, y1, x2, y2, score, class) = 122.0, 68.0, 218.0, 185.0, 0.997959, 2
Box 3 (x1, y1, x2, y2, score, class) = 87.0, 84.0, 131.0, 118.0, 0.499075, 2
Box 4 (x1, y1, x2, y2, score, class) = 28.0, 77.0, 55.0, 100.0, 0.367952, 2
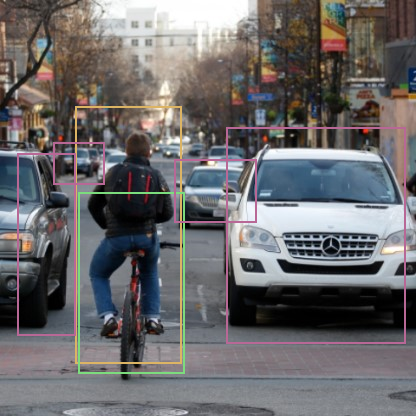
output bounding boxes on 'output_bike_cars_street_224x224.bmp'
Besides output results in the screen console, it also draws detected objects in a new-created output_bike_cars_street_224x224.bmp.
4.2 KL630
$ sudo ./kl630_demo_generic_image_inference_post_yoloconnect device ... OK
upload firmware ... OK
upload model ... OK
read image ... OK
starting inference loop 10 times:
..........
inference loop is done, starting post-processing ...
doing yolo v5 post-processing ...
detectable class count : 80
box count : 17
Box 0 (x1, y1, x2, y2, score, class) = 53.0, 276.0, 73.0, 292.0, 0.201538, 0
Box 1 (x1, y1, x2, y2, score, class) = 51.0, 272.0, 86.0, 293.0, 0.178711, 0
Box 2 (x1, y1, x2, y2, score, class) = 70.0, 277.0, 92.0, 292.0, 0.174072, 0
Box 3 (x1, y1, x2, y2, score, class) = 124.0, 267.0, 133.0, 287.0, 0.168457, 0
Box 4 (x1, y1, x2, y2, score, class) = 303.0, 261.0, 471.0, 434.0, 0.856689, 2
Box 5 (x1, y1, x2, y2, score, class) = 159.0, 257.0, 198.0, 328.0, 0.674927, 2
Box 6 (x1, y1, x2, y2, score, class) = 0.0, 274.0, 12.0, 300.0, 0.658447, 2
Box 7 (x1, y1, x2, y2, score, class) = 10.0, 265.0, 38.0, 293.0, 0.639160, 2
Box 8 (x1, y1, x2, y2, score, class) = 26.0, 263.0, 131.0, 392.0, 0.550537, 2
Box 9 (x1, y1, x2, y2, score, class) = 107.0, 270.0, 134.0, 317.0, 0.507080, 2
Box 10 (x1, y1, x2, y2, score, class) = 0.0, 269.0, 19.0, 303.0, 0.351562, 2
Box 11 (x1, y1, x2, y2, score, class) = 25.0, 261.0, 131.0, 394.0, 0.476074, 7
Box 12 (x1, y1, x2, y2, score, class) = 159.0, 258.0, 198.0, 328.0, 0.177612, 7
Box 13 (x1, y1, x2, y2, score, class) = 304.0, 259.0, 472.0, 436.0, 0.165649, 7
Box 14 (x1, y1, x2, y2, score, class) = 121.0, 163.0, 155.0, 221.0, 0.837158, 11
Box 15 (x1, y1, x2, y2, score, class) = 204.0, 61.0, 251.0, 141.0, 0.697632, 11
Box 16 (x1, y1, x2, y2, score, class) = 318.0, 172.0, 351.0, 224.0, 0.643372, 11
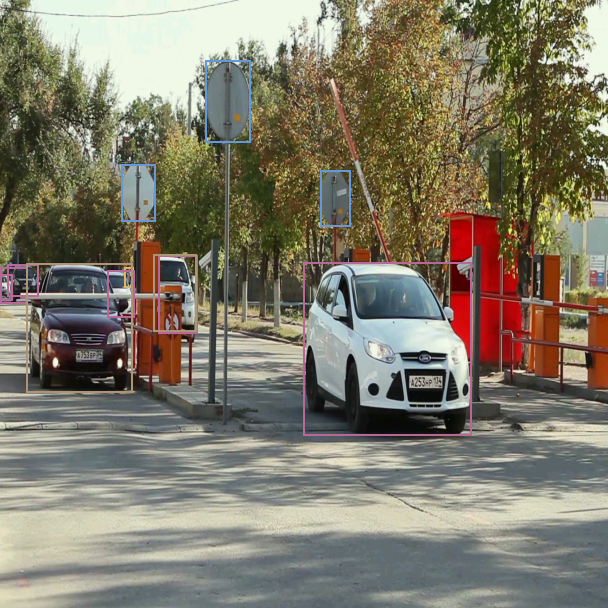
output bounding boxes on 'output_car_park_barrier_608x608.bmp'
Besides output results in the screen console, it also draws detected objects in a new-created output_car_park_barrier_608x608.bmp.

4.3 KL720
sudo ./kl720_demo_generic_image_inference_post_yoloconnect device ... OK
upload model ... OK
read image ... OK
starting inference loop 100 times:
.......................................
detectable class count : 80
box count : 14
Box 0 (x1, y1, x2, y2, score, class) = 51.3, 272.6, 81.7, 293.5, 0.202698, 0
Box 1 (x1, y1, x2, y2, score, class) = 52.2, 276.4, 70.3, 291.6, 0.178284, 0
Box 2 (x1, y1, x2, y2, score, class) = 69.3, 276.4, 92.1, 292.6, 0.158936, 0
Box 3 (x1, y1, x2, y2, score, class) = 304.0, 261.2, 471.2, 433.2, 0.871460, 2
Box 4 (x1, y1, x2, y2, score, class) = 158.6, 257.4, 197.6, 329.6, 0.664673, 2
Box 5 (x1, y1, x2, y2, score, class) = 9.5, 264.1, 38.0, 293.5, 0.648193, 2
Box 6 (x1, y1, x2, y2, score, class) = 0.0, 272.6, 17.1, 301.1, 0.620605, 2
Box 7 (x1, y1, x2, y2, score, class) = 25.6, 263.1, 131.1, 392.3, 0.563965, 2
Box 8 (x1, y1, x2, y2, score, class) = 106.4, 269.8, 133.9, 316.3, 0.540527, 2
Box 9 (x1, y1, x2, y2, score, class) = 25.6, 261.2, 131.1, 394.2, 0.457764, 7
Box 10 (x1, y1, x2, y2, score, class) = 160.5, 258.4, 198.5, 326.8, 0.172119, 7
Box 11 (x1, y1, x2, y2, score, class) = 120.6, 163.4, 154.8, 221.3, 0.844910, 11
Box 12 (x1, y1, x2, y2, score, class) = 205.2, 60.8, 249.8, 141.6, 0.697632, 11
Box 13 (x1, y1, x2, y2, score, class) = 320.1, 171.9, 350.5, 225.1, 0.689880, 11
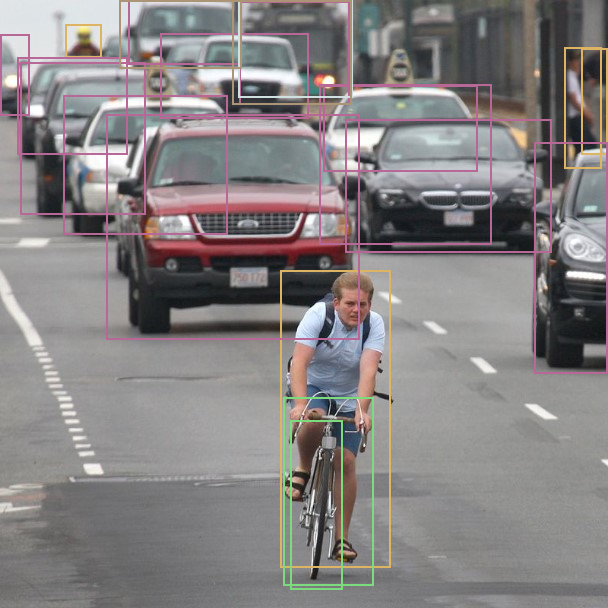
output bounding boxes on 'output_car_park_barrier_608x608.bmp'Besides output results in the screen console, it also draws detected objects in a new-created output_one_bike_many_cars_608x608.bmp.
4.4 KL730
$ sudo ./kl730_demo_generic_image_inference_post_yoloconnect device ... OK
upload firmware ... OK
upload model ... OK
read image ... OK
starting inference loop 10 times:
..........
inference loop is done, starting post-processing ...
doing yolo v5 post-processing ...
detectable class count : 80
box count : 13
Box 0 (x1, y1, x2, y2, score, class) = 124.0, 267.0, 133.0, 287.0, 0.155090, 0
Box 1 (x1, y1, x2, y2, score, class) = 303.0, 262.0, 471.0, 435.0, 0.719055, 2
Box 2 (x1, y1, x2, y2, score, class) = 26.0, 263.0, 132.0, 392.0, 0.508118, 2
Box 3 (x1, y1, x2, y2, score, class) = 7.0, 264.0, 38.0, 296.0, 0.473145, 2
Box 4 (x1, y1, x2, y2, score, class) = 0.0, 274.0, 12.0, 300.0, 0.447144, 2
Box 5 (x1, y1, x2, y2, score, class) = 107.0, 270.0, 134.0, 317.0, 0.372437, 2
Box 6 (x1, y1, x2, y2, score, class) = 158.0, 255.0, 197.0, 333.0, 0.323059, 2
Box 7 (x1, y1, x2, y2, score, class) = 0.0, 267.0, 27.0, 303.0, 0.263916, 2
Box 8 (x1, y1, x2, y2, score, class) = 26.0, 263.0, 132.0, 392.0, 0.325195, 7
Box 9 (x1, y1, x2, y2, score, class) = 153.0, 254.0, 196.0, 331.0, 0.278320, 7
Box 10 (x1, y1, x2, y2, score, class) = 121.0, 164.0, 155.0, 221.0, 0.491943, 11
Box 11 (x1, y1, x2, y2, score, class) = 320.0, 170.0, 350.0, 226.0, 0.340576, 11
Box 12 (x1, y1, x2, y2, score, class) = 205.0, 60.0, 250.0, 142.0, 0.317871, 11
output bounding boxes on 'output_car_park_barrier_608x608.bmp'
Besides output results in the screen console, it also draws detected objects in a new-created output_car_park_barrier_608x608.bmp.