Kneron End to End Simulator v0.15.5

This project allows users to perform image inference using Kneron's built in simulator. As of version 0.5.0 the 520 and 720 simulators have been merged into one codebase, and any existing apps will need to be updated to the new structure to work.

File Structure

Example app folder structure

App folder structure

Example app folder structure

Configuring Input

Kneron simulator uses a JSON file to specify parameters used throughout the testing process.

Example input JSON configurations (app/fd_external/input_jsons/fd_rgb.json)

In each JSON, there are three sections (pre, emu, post) to define parameters necessary to complete the testing process. The parameters shown are the minimum required to run the simulator; you may add new parameters to the "pre" or "post" to pass into your preprocess or postprocess functions.

If any of the required keys are missing, the program will end. The required keys will be specified in their respective sections.

Preprocess Parameters

Required keys: pre_type

Name Description Acceptable Values
pre_bypass Specifies whether preprocessing should be bypassed, default is false true, false
pre_type Name of the preprocess function to run, in Python import format any preprocess function you wish to call

Simulator Parameters

You only need to specify the parameters for the type of inferencer you intend to use. Paths to files should be relative to the base of your app folder or absolute.

Required key in general: emu_mode

Required keys if hardware CSIM 520/720 is used: setup_file, command_file, weight_file

Required keys if Dynasty is used: onnx_file/bie_file (depending on emu_mode), onnx_input

Name Description Acceptable Values
emu_mode Specifies what inferencer to use "csim", "float", "fixed", "dongle", "bypass"
model_type Used to specify output paths and files any string
platform Platform of the Kneron inferencer for CSIM, default is 520 520, 720
channel_first Flag to specify if you want the inference results to be returned in channel last or first format, default is false true, false
setup_file Name of the binary setup file used for Kneron CSIM 520/720 any string path
command_file Name of the binary command file used for Kneron CSIM 520/720 any string path
weight_file Name of the binary weight file used for Kneron CSIM 520/720 any string path
ioinfo_file Name of the CSV file to map output number to name for Kneron CSIM 520/720 and dongle any string path
num_inputs Number of inputs to the model, CSIM 520/720 only, default is 1 any non-negative integer
data_type Type of the NumPy array returned to your postprocess function, only for CSIM and Dynasty fixed "float", "fixed"
radix Radix used to convert from float input to integer input used for CSIM 520/720 any non-negative integer
bie_file Name of BIE file to use for the Kneron Dynasty simulator, use with "fixed" emu_mode any string
onnx_file Name of ONNX file to use for the Kneron Dynasty simulator, use with "float" emu_mode any string
onnx_input Name of the input nodes to the ONNX model list of strings
reordering List of how the inference outputs should be reordered, default is [] list of integers or list of strings
model_id Integer ID of the model that you would like to perform inference with, only dongle any non-negative integer

Note on the reordering parameter: this can be specified for your convenience in the postprocess function. By default, the inference results for CSIM and Dynasty will be returned in alphabetical order of the output file names. For CSIM, this will be in order of the outputs designated by CSIM: 1, 2, 3,... For Dynasty, this will be in order of the output node names. If you do not specify the ioinfo_file parameter, the reordering parameter for CSIM should be a list of integers, based on the output order designated by CSIM. Otherwise, it should be a list of strings, based on the output node names. The reordering parameter for Dynasty should be a list of strings, based on the output node names.

Postprocess Parameters

Required keys: post_type

Name Description Acceptable Values
post_bypass Specifies whether postprocess should be bypassed, default is false true, false
post_type Name of the postprocess function to run, in Python import format any postprocess function you wish to call

Custom pre/postprocess

Since inference results can vary based on users' tests, we provide support for integrating custom preprocess and postprocess functions. The preprocess and postprocess functions you supply into the pre_type and post_type fields must follow the API that we provide.

Both the preprocess and postprocess must take in a TestConfig class as input. For reference, you can find it defined at python_flow/common/config.py. This class is filled with parameters from the supplied input JSONs and other environment variables. To access all of those parameters, you will need to access the "config" attribute, a dictionary. There are four keys to access the dictionary: pre, emu, post, and flow. The first three keys have values that are dictionaries with the same exact values as in the JSON files. The flow key simply has values parsed from the command line options and other environment variables such as the input image.

The preprocess must take in as input a TestConfig class and a variable that represents anything you may want to pass into your preprocess function. The second variable may be needed, for example, if your preprocess depends on the results of a previous stage in the flow. It must output a tuple consisting of a list of NumPy arrays and a dictionary. The list of NumPy arrays should be in channel last format (1, h, w, c) and have a one-to-one correspondence with each input you have in your model. The dictionary holds any values you wish to communicate from your preprocess to your postprocess.

The postprocess must take in as input a TestConfig class, a dictionary, and a list of NumPy arrays. The TestConfig class is the same class as used in the preprocess. The dictionary is the same as the second output of your preprocess function. The last input is the results of the model inference. There will be one NumPy array per output of your model, and by default, each array will be in channel last format (d1, d2, ..., c). The order of the output nodes will be based on the list you provided in the reordering field in the input JSON. The output for the postprocess can be anything that is convenient for your needs.

For preprocess/postprocess reference, you may look at app/fd_external/preprocess/fd.py and app/fd_external/postprocess/fd.py. For a template of the API, you may look at app/template_app.

Preprocess

Python defined

If your preprocess functions are defined in Python, integration is simple.

  1. Make sure your Python function takes two parameters as input: a TestConfig class and a prev_output variable.
  2. Make sure your return value is a tuple of a list of your preprocessed NumPy arrays in channel last format and a dictionary of values to be passed to the postprocess.
  3. Set the value of the pre_type field in the input JSON to the name of your function, as defined here.

C defined

  1. Compile the C/C++ functions into a shared library (.so). Be sure to add extern "C" to any C++ functions you intend to directly call in the Python flow.
  2. Copy the library into your application's directory.
  3. Import the shared library into whichever module needs it using the standard ctypes module:

    MY_LIB = ctypes.CDLL("./my_lib.so")
  4. Define any C/C++ structures that are needed for parameters as classes in Python. These classes must extend ctypes.Structure and store the structure fields in the _fields_ variable. This is a list of tuples where the first item is the name of the variable, and the second item is the type of that variable. The names and order must be defined exactly as in the C code.

  5. Define a wrapper to the C/C++ function you wish to call. You need to specify three items: the function name as defined in the C code, the input argument types, and the result argument types.
  6. Create a Python function that takes a TestConfig class and prev_output variable as input that calls your function wrapper. You can get the inputs you need from the TestConfig class and pass it to the wrapper as needed.
  7. Make sure your return value is a tuple of a list of your preprocessed NumPy arrays in channel last format and a dictionary of values to be passed to the postprocess. You will need to translate your C preprocessed data into NumPy arrays for the return value.
  8. Set the value of the pre_type field in the input JSON to the name of your function, as defined here.

C defined (using Python API in c_interface/preprocess.py)

  1. Add your preprocess function into c_interface/520/preprocess/pre_processing_main.c or into 720. Make sure it takes in a kdp_image structure (or pointer) as input. Compile the shared library by going into the c_interface directory and running make.
  2. Import the shared library into whichever module needs it using the standard ctypes module:

    MY_LIB = ctypes.CDLL("c_structure/libprocessing520.so")

The path will need to be modified if you are using a relative path. You may use an absolute path as well. 3. Define any extra C/C++ structures that are needed for parameters as classes in Python. These classes must extend ctypes.Structure and store the structure fields in the _fields_ variable. This is a list of tuples where the first item is the name of the variable, and the second item is the type of that variable. The names and order must be defined exactly as in the C code. 4. Define a wrapper to the C/C++ function you wish to call. You need to specify three items: the function name as defined in the C code, the input argument types, and the result argument types. 5. Create a Python function that takes a TestConfig class and prev_output variable as input that calls your function wrapper. You can get the inputs you need from the TestConfig class and pass it to the wrapper as needed. 6. Call either load_image_to_memory or load_binary_to_memory, depending on the type of your input image, to load the file into the kdp_image structure. 7. Call your Python C function wrapper. 8. Call get_rgb_data to get the preprocessed C data into a NumPy array in channel last format. 9. Make sure your return value is the NumPy array from get_rgb_data and a dictionary of values to be passed to the postprocess. 10. Set the value of the pre_type field in the input JSON to the name of your function, as defined here.

Note: examples on the structure wrappers can be found under c_structure in the kdp_image files; examples on the function wrappers can be found under c_structure in postprocess.py and preprocess.py.

Postprocess

Python defined

If your postprocess functions are defined in Python, integration is simple yet again.

  1. Make sure your Python function takes three parameters as input: a TestConfig class, a dictionary, and a list of NumPy arrays.
  2. Make sure your return value is whatever is convenient for your usage.
  3. Set the value of the post_type field in the input JSON to the name of your function, as defined here.

C defined

  1. Like the preprocess, compile the C/C++ functions into a shared library (.so).
  2. However, your postprocess C function should take in an kdp_image structure as input, as the helper functions will load data into this class. Depending on the version, the Python class is defined in c_structure/kdp_image_520.py or c_structure/kdp_image_720.py, and the C structure is defined in c_structure/520/include/kdpio.h or c_structure/720/postprocess/kneron_api_data.h. Your postprocess function MUST include the header containing the kdp_image structure for the corresponding version that you wish to run.
  3. Copy the library into your application's directory.
  4. Import the shared library into whichever module needs it using the standard ctypes module.
  5. Define any C/C++ structures and function wrappers that are needed as in the preprocess.
  6. Create a Python function that takes a TestConfig class and prev_output variable as input that calls your function wrapper. You must load the output data into memory before calling your function wrapper. To do so, call run_c_function with the appropriate arguments. Example usage can be found in app/fdr_external/postprocess/fd.py under the postprocess function. Do note that these functions currently only work with CSIM, since the setup.bin file is required as input.
  7. Make sure your return value is whatever is convenient for your usage. You may also use get_result to help get the Python data structure back if your result is stored in a structure inside kdp_image.
  8. Set the value of the post_type field in the input JSON to the name of your function, as defined here.

There are also some conversion functions for your convenience under python_flow/utils/utils.py. Use convert_binary_to_numpy to get a NumPy array from an input binary image. Use convert_pre_numpy_to_rgba to dump a NumPy array into RGBA binary used for CSIM.

Usage

usage: simulator.py [-h] [-j JSON_OPTIONS] [-b BIN_INPUT] [-c {before,none}]
                    [--debug] [-d] [--dump] [-f {ALL,INF,NIR,RGB}] [-fl FLOW]
                    [--fusion] [-il IMAGE_JSON] [-i {binary,image,image_txt}]
                    [-n NUM_IMAGES] [-p {alg,sys520,sys530,sys720}] [-r]
                    [--runner_dump [RUNNER_DUMP [RUNNER_DUMP ...]]] [--rgba]
                    [-s] [-v VIDEO VIDEO VIDEO] [-w WORKERS] [-g GROUP]
                    [-in NUM_INFERENCE] [-bp] [-dfix]
                    app_folder image_directory test

Runs a test on multiple images

positional arguments:
  app_folder            directory of your application
  image_directory       directory of images to test
  test                  type of test to be run, should be one of the functions in your app's flow.py

optional arguments:
  -h, --help            show this help message and exit
  -j JSON_OPTIONS, --json_options JSON_OPTIONS
                        JSON file holding the command line options.
                        NOTE: using this option will ignore all other provided options.
  -b BIN_INPUT, --bin_input BIN_INPUT
                        file to specify the format and dimensions of the binary inputs
  -c {before,none}, --clear {before,none}
                        when to clear CSIM or Dynasty dumps, default: 'before'
  --debug               enable debug flag for the runners
  -d, --debug_print     flag to enable prints
  --dump                flag to dump intermediate node outputs for the simulator
  -f {ALL,INF,NIR,RGB}, --fmt {ALL,INF,NIR,RGB}
                        format of the input images to test, default:'ALL'
  -fl FLOW, --flow FLOW
                        suffix of flow.py to run
  --fusion              flag to enable fusion test input
  -il IMAGE_JSON, --image_json IMAGE_JSON
                        path to JSON file holding all of the test images, to be used instead of image_directory if specified
  -i {binary,image}, --inputs {binary,image}
                        type of inputs to be tested, default: 'image'
  -n NUM_IMAGES, --num_images NUM_IMAGES
                        number of images to test
  -p {alg,sys520,sys530,sys720}, --platform {alg,sys520,sys530,sys720}
                        platform to use for input JSON subfolder, only internal runners are affected, default will use no subfolder
  -r, --resume          flag to resume dataset from where it left off previously
  --runner_dump [RUNNER_DUMP [RUNNER_DUMP ...]]
                        name of runners to dump result
  --rgba                flag to dumb preprocessed RGBA binary
  -s, --sort            sort the images in alphanumerical order
  -v VIDEO VIDEO VIDEO, --video VIDEO VIDEO VIDEO
                        parameters to help drop images for video
                        (1) 'excess', 'randomly', 'periodically'
                        (2) app fps
                        (3) video fps
  -w WORKERS, --workers WORKERS
                        number of worker processes to run, default: 1
  -g GROUP, --group GROUP
                        group using this e2e platform(CI/SYS/ALGO)
  -in NUM_INFERENCE, --num_inference NUM_INFERENCE
                        number of devices (520/720) to run inference, default: 1
  -bp, --bypass_batch_compile
                        flag to bypass batch compile
  -dfix, --dongle_fixed_mode
                        flag to enable dongle to return fixed result then convert to float using CSIM utility function

Adding own application

We will go over how to create your own application for testing. It is recommended to copy app/template_app as a base; we will refer to this application as my_app. All your application code should be placed under app/my_app/.

You will need the following to run your application:

Model files

To get the input model files from your model, follow the steps in section 2. The ONNX, BIE, ioinfo CSV, and weight/setup/command binaries will all be generated upon completing step 2.3.

Preprocess and postprocess

Follow these steps to add your preprocess and postprocess functions. You may use my_app/template_app/preprocess.py and my_app/template_app/postprocess.py as a guideline.

Setting up JSON

We will be using my_app/postprocess.py, my_app/preprocess.py, and my_app/input_jsons/example.json for this section. Reminder that all input JSON files MUST be placed under my_app/input_jsons. Refer to these tables for more information about each specific parameter.

  1. Fill in the pre_type and post_type fields with the corresponding functions you would like to run for preprocess and postprocess. In our case, it will be the preprocess and postprocess functions in their respective files. You want to fill in these two fields with a string that is similar to a Python import, with the import being relative to my_app/. For the pre_type field, it would be preprocess.preprocess. It is essentially the relative path to the preprocess file with "." instead of "/", and with the name of your preprocess function attached to the end. It is the same case for the postprocess function.
  2. Fill in the type of inferencer and Kneron platform you wish to use in emu_mode and platform.
  3. Fill in model_type with the name of your model (this is only for dumping out files).
  4. Fill in the subsection that you set in emu_mode with the correct values. The paths you specify may be absolute or relative to my_app/.
  5. Fill in or modify any other sections in the input JSON that you feel is appropriate.

Setting up flow

We will be referring to my_app/flow.py for this section. DO NOT place flow.py in another folder; it must be placed in the base folder of the application.

Example flow.py

  1. Import python_flow/flow.py.
  2. Fill in the user_config dictionary with all of the input JSON files to be used. The key should be the model name, and the value should be the path to the input JSON, relative to my_app/. The model name here does not need to match the model_type in the input JSON; it will just be for access in your test function. DO NOT change the name of user_config.
  3. Define a test function that takes in as input a list of string image files and a dictionary of models mapped to a TestConfig. (your_test_name in this example). The list of string image files will be of length one unless you choose the fusion command line option; normally you would either select bin or image (fusion is a special case).
    1. Call flow.run_simulator once for each stage in your flow. The inputs are a TestConfig class, the list of input image files, and any data you wish to pass into your preprocess function. The TestConfig class comes from accessing the user_config dictionary with the model JSON you wish to use. The preprocess input may be set to None if you do not need it.
    2. Add any extra work you may need for your testing.
  4. You may return a dictionary to be dumped out to a file. The dictionary will be dumped to an output JSON file in a file called results.json with the same keys and values that you provide. There will be one JSON file per input image that you provide; it will be under the bin folder following the same path as the original image. This is for convenience to see all the results for each test image that you provide.

Running the test.

The last step is to prepare your image dataset. Your image data set can be placed anywhere. An small example dataset is in app/test_image_folder.

Now, we can run the test. Arguments are explained here. This is assuming you copied my_app into the app folder.

python3 simulator.py app/my_app your_test_image_folder your_test_name

Use this command to run the fdr example set up in app/fd_external:

python3 simulator.py app/fd_external app/test_image_folder/fd fdr

Python API Inference

This is a standalone feature that allows the user to perform inference given a model and some inputs. This is separate from the E2E Simulator itself. For details, you can take a look at python_flow/kneron_inference.py.

Necessary items

There are only two items that you need to prepare to run the inference function. Everything else is optional.

Inputs

def kneron_inference(pre_results, nef_file="", onnx_file="", bie_file="", model_id=None,
                     input_names=[], radix=8, data_type="float", reordering=[],
                     ioinfo_file="", dump=False, platform=520)

Usage

Prepare a preprocess function and postprocess function. Then, simply call the kneron_inference function using the results of your preprocess function and input model file to get inference results. Then, use those inference results as input into your postprocess function.

Example

For a detailed example on how to call the kneron_inference function, please explore this YOLO example.

FAQ

1. How do I enable simulator output?

When printing info in Python, by default, the simulator will suppress the output. To enable this printing, use the -d option on the command line.

2. How can I display bounding box results on my image?

There is a display function in python_flow/utils/utils.py that can be called. When using this function, the list of bounding boxes input will need to follow a specific format. Each box in the list must have the following values to display the correct box on the image: (x, y, w, h, score, class).

3. How do I convert the CSIM fixed point inference results into floating point results?

The inference output when using CSIM 520/720 are fixed point values in a text file. By default, the simulator will convert those fixed point values into floating point NumPy arrays. You can set the data_type field in the input_json to get the inference results as fixed point values. The conversion from fixed to floating point values is as follows:

float_val = fixed_val / scale / (2 ^ radix)

Through CSIM, every output node has a corresponding scale and radix value. For 520, this is stored in a file called radix_scale_info.txt in the same directory as the output values. For 720, this is stored in a file called dma2seq.info per output node in the same directory as the output values.

4. What are the memory layouts for the inference results of CSIM 520 and 720?

The memory layout for the output node data after CSIM inference is different between 520 and 720. For 520, the data values are in (h, c, w_align) format, where w_align is the width aligned to the nearest 16 bytes. For 720, the data values are in (c, h, w_align) format, where w_align is the width aligned to the nearest 16 bytes.

Let's look at an example where c = 4, h = 12, and w = 12. Indexing starts at 0 for this example.
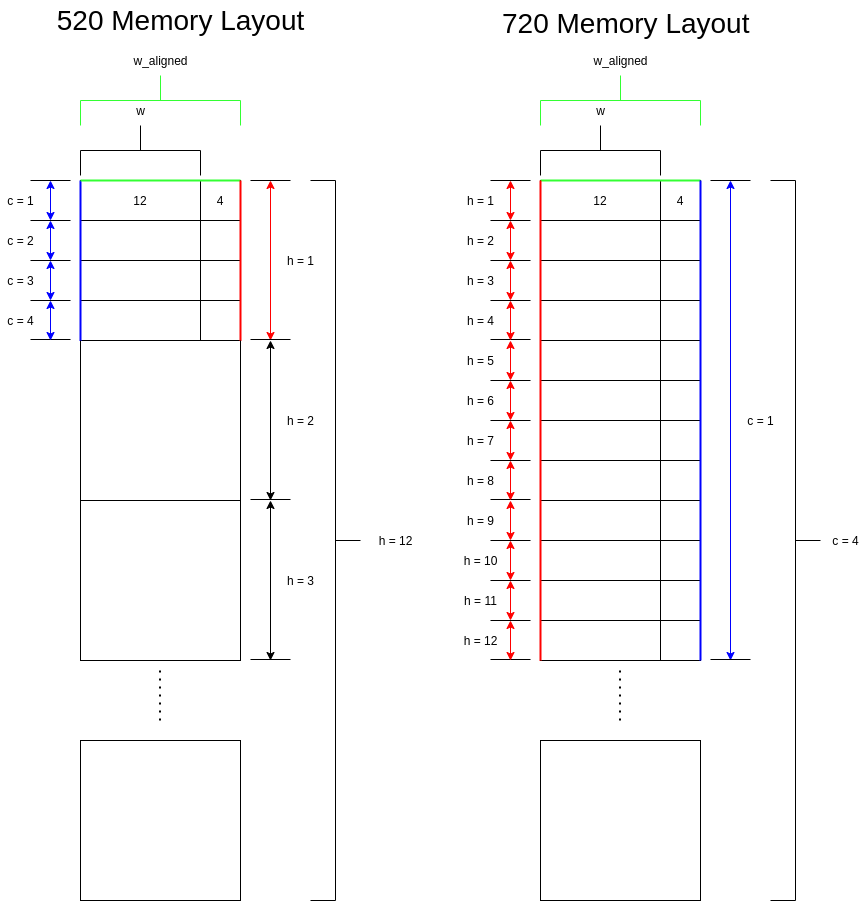
Memory layouts

For both 520 and 720, we can see that the first 12 bytes of data correspond to the width dimension. The next 4 bytes will then be filled with whatever data is in that memory after inference, since the width dimension is aligned to the nearest 16 bytes. The following is where we see the difference in layouts between 520 and 720: for 520, the channel dimension is next, but for 720, the height dimension is next.

For 520, the next 16 bytes of data correspond to channel of 1, while for 720, the next 16 bytes of data correspond to height of 1. Let's take the 20th byte of data as an example. For 520, this would correspond to c = 1, w = 4, and h = 0. However, for 720, this would correspond to c = 0, w = 4, and h = 1.

To recap, for 520, width increments first, up to the aligned 16 byte width. Channel increments next, and height increments last. For 720, width increments first, also up to the aligned 16 byte width. Height increments next, and channel increments last.

Useful notes/recap/reminder