Run Examples
Note: Please build Kneron PLUS first.
Note: If you are using Windows, please execute all the instruction below in MSYS2 MinGW 64-bit.
Note: To execute MSYS2 MinGW 64-bit, please use the shortcut or c:\msys64\msys2_shell.cmd -mingw64 instead of c:\msys64\mingw64.exe.
Note: In the inference related examples, we are using KL520 for most demo. If you wish to use KL630, KL720, or KL730, just change the prefix of the example name from kl520 to kl630, kl720, or kl730.
Note: Few examples will auto connect multiple devices to run inference. If you put hybrid types of devices on host, the inference may fail.
Note: If you modify code to change different test image file. Input image aspect ratio is suggested to be aligned to model input aspect ratio.
Note: The KL730 pre-built firmware.tar included in Kneron PLUS v3.2.0 requires the KL730 EVM/HDK BSP to be upgraded to SDK v2.0.0 or later.
The provided examples are designed to show how to use KP APIs and present Kneron Device features. Error handling, wording and application layer features are not covered. They are open for more creatives.
Index
- 1. System Examples
- 2. Inference API Examples
- 3. Parallel Usage Control Examples
- 4. Model Zoo Examples
- 5. Debug Related Examples
1. System Examples
System control APIs are provided for information extract, data upload and device connection.
Please see the following examples for API usage
- Scan Device Example
- Connect Device Example
- Install Driver for Windows Example
- Load Firmware and Model Example
- Generic Command Example
- DFUT_console utility example
1.1 Scan Device Example
Note: This example is to show the usage of kp_scan_devices().
While one or multiple AI devices are plugged into the host, they can be scanned to get some basic device information.
$ sudo ./scan_devicesscanning kneron devices ...
number of Kneron devices found: 2
listing devices information as follows:
[0] scan_index: '0'
[0] port ID: '517'
[0] product_id: '0x100' (KL520)
[0] USB link speed: 'High-Speed'
[0] USB port path: '1-1-4'
[0] kn_number: '0x270A265C'
[0] Connectable: 'True'
[0] Firmware: 'KDP'
[1] scan_index: '1'
[1] port ID: '38'
[1] product_id: '0x100' (KL520)
[1] USB link speed: 'High-Speed'
[1] USB port path: '1-1-5'
[1] kn_number: '0x63252C53'
[1] Connectable: 'True'
[1] Firmware: 'KDP2 Loader'Above shows that it founds two KL520 devices, a brief description listed below.
- scan_index : An index number represents the device in the scanned order, can be used by KP API to establish USB connection.
- port ID : An unique number represents the device on the certain usb port, can be used by KP API to establish USB connection.
- product_id : The product ID.
- USB link speed : USB link speed, High-Speed is speed for USB2.0. Super-Speed is speed for USB3.0.
- USB port path : This means the physical USB port path on the host.
- kn_number : Kneron's serial number for the device.
- Connectable : It tells if this device is connectable; one device can only be connected by one program at the same time.
- Firmware : This shows which firmware the AI device is using, KDP or KDP2 Loader.
1.2 Connect Device Example
This example is to show the usage of kp_device_group_t, kp_connect_device() and different filter ways of finding target devices to connect. Furthermore, the kp_device_group_t is a working unit to be operated in Kneron PLUS API.
Notice that it is not allowed to connect different target platform devices into a deivce group.
sudo ./connect_devices --helpconnect_devices example
show different filter ways of finding target devices to connect
Notice that it is not allowed to connect different target platform devices into a device group
Arguments:
-help, h : print help message
-target, t : [by target platform] = (KL520|KL720)
-sidx, s : [by scan index set] = (specified scan index set, can also be "0,1,2" for multiple devices)
-port, p : [by port id set] = (specified port id set, can also be "13,537" for multiple devices)
-kn, k : [by KN number set] = (specified KN number set, scan also be "0x1111aaaa, 0x2222bbbb" for multiple devices)- target: using the target platform (KL520 or KL720) to connect.
- sidx: using the specified scan index set to connect.
- port: using the port id set to connect.
- kn: using the KN number set to connect.
1.3 Install Driver for Windows Example
Note: This example is only provided in Kneron PLUS v1.3.0 and above.
Note: This example is only available on Windows 10, and it must be run as Administrator.
This example is to show the usage of kp_install_driver_for_windows() and help users to install driver to Windows directly.
-
For installing the driver for KL520:
$ ./install_driver_windows.exe -target KL520[arguments] -h : help -target: [target platform] (ALL, KL520, KL630, KL720, KL730) = KL520 [note] You must run this app as administrator on Windows Installing driver for KL520 ... Success (0) -
For installing the driver for KL630:
$ ./install_driver_windows.exe -target KL630[arguments] -h : help -target: [target platform] (ALL, KL520, KL630, KL720, KL730) = KL630 [note] You must run this app as administrator on Windows Installing driver for KL520 ... Success (0) -
For installing the driver for KL720:
$ ./install_driver_windows.exe -target KL720[arguments] -h : help -target: [target platform] (ALL, KL520, KL630, KL720, KL730) = KL720 [note] You must run this app as administrator on Windows Installing driver for KL720 ... Success (0) -
For installing the driver for KL730:
$ ./install_driver_windows.exe -target KL730[arguments] -h : help -target: [target platform] (ALL, KL520, KL630, KL720, KL730) = KL730 [note] You must run this app as administrator on Windows Installing driver for KL730 ... Success (0)
1.4 Load Firmware and Model Example
kp_load_firmware_from_file() is an API to load firmware file from host to the AI device via USB. And this API is only available when device is on USB Boot Mode. Please refer Upgrade AI Device To KDP2 for more information.
kp_load_model_from_file() is an API to load model file from host to the AI device via USB. Please refer Write Model to Flash for more information.
kp_load_model_from_flash() is an API to load model from the flash memory of the AI device. Please refer Generic Inference Using Model in Flash and Write Model to Flash for more information.
1.5 Generic Command Example
The generic_command is an example for showing you how to use few system API:
-
Get System Info :
kp_get_system_info().Note: Firmware must be loaded into device first.
$ sudo ./generic_command -target KL520 -port 533 -cmd system[note - using default parameter values if no value is passed] -target: [target platform] (KL520, KL720, KL630, KL730, KL830) = KL520 (default: KL520) -sidx : [scan index] = default (specified scan index) (default: scan index of the first scanned Kneron device) -port : [port id] = 533 (specified port id) (default: port ID of the first scanned Kneron device) Notice that scan index has higher priority than port id -cmd : [command type] (system-showSystemInfo, model-showModelInfo, reboot, shutdown) = system (default: system) Notice that shutdown command is not supported by KL720 connect target: index '0', port ID '533' connect device ... OK kn_number: 0xAC0A205C FW_version: 1.7.0-build.1217 PLUS_version: RD version disconnecting device ... -
Get Model Info :
kp_get_model_info().Note: Firmware and Model must be loaded into device first.
$ sudo ./generic_command -target KL520 -port 533 -cmd model[note - using default parameter values if no value is passed] -target: [target platform] (KL520, KL720, KL630, KL730, KL830) = KL520 (default: KL520) -sidx : [scan index] = default (specified scan index) (default: scan index of the first scanned Kneron device) -port : [port id] = 533 (specified port id) (default: port ID of the first scanned Kneron device) Notice that scan index has higher priority than port id -cmd : [command type] (system-showSystemInfo, model-showModelInfo, reboot, shutdown) = model (default: system) Notice that shutdown command is not supported by KL720 connect target: index '0', port ID '533' connect device ... OK fw memory contains 1 model(s): all models crc = 0x6CBF1FF9 [1] model ID = 19 [1] model raw input width = 224 [1] model raw input height = 224 [1] model input channel = 3 [1] model raw image format = RGBA8888 [1] model raw output size = 85796 Note that if you want to query the model info in the flash, please load model first via 'kp_load_model_from_flash()' Be careful that 'kp_load_model_from_flash()' will clean up and replace the model data stored in fw memory! disconnecting device ... -
Reboot :
kp_reset_device()with KP_RESET_REBOOT.Note: Firmware must be loaded into device first.
$ sudo ./generic_command -target KL520 -port 533 -cmd reboot[note - using default parameter values if no value is passed] -target: [target platform] (KL520, KL720, KL630, KL730, KL830) = KL520 (default: KL520) -sidx : [scan index] = default (specified scan index) (default: scan index of the first scanned Kneron device) -port : [port id] = 533 (specified port id) (default: port ID of the first scanned Kneron device) Notice that scan index has higher priority than port id -cmd : [command type] (system-showSystemInfo, model-showModelInfo, reboot, shutdown) = reboot (default: system) Notice that shutdown command is not supported by KL720 connect target: index '0', port ID '533' connect device ... OK reboot device ... OK disconnecting device ... -
Shutdown :
kp_reset_device()with KP_RESET_SHUTDOWN.Note: Firmware must be loaded into device first. Note: KL720 does NOT support this feature.
$ sudo ./generic_command -target KL520 -port 533 -cmd shutdown[note - using default parameter values if no value is passed] -target: [target platform] (KL520, KL720, KL630, KL730, KL830) = KL520 (default: KL520) -sidx : [scan index] = default (specified scan index) (default: scan index of the first scanned Kneron device) -port : [port id] = 533 (specified port id) (default: port ID of the first scanned Kneron device) Notice that scan index has higher priority than port id -cmd : [command type] (system-showSystemInfo, model-showModelInfo, reboot, shutdown) = shutdown (default: system) Notice that shutdown command is not supported by KL720 connect target: index '0', port ID '533' connect device ... OK shutdown device ... OK disconnecting device ...
1.6 DFUT_console
Note: This tool is only provided in Kneron PLUS v1.3.0 and above.
Please refer Build with DFUT_console
DFUT_console provides only the console interface of the Kneron DFUT.
Therefore, all the functions in console mode, other than executable file name, are the same.
-
For upgrading KL520 to USB boot mode, please refer Upgrade KL520 to USB Boot Mode.
-
For upgrading KL520 to Flash boot mode, please refer Upgrade KL520 to Flash Boot Mode.
-
For writing model into KL520, please refer Write Model Into KL520.
-
For upgrading KL630 to USB boot mode, please refer Upgrade KL630 to USB Boot Mode.
-
For upgrading KL630 to Flash boot mode, please refer Upgrade KL630 to Flash Boot Mode.
-
For writing model into KL630, please refer Write Model Into KL630.
-
For upgrading KL720 to Flash boot mode, please refer Upgrade KL720 to Flash Boot Mode.
-
For writing model into KL720, please refer Write Model Into KL720.
-
For upgrading KL730 to USB boot mode, please refer Upgrade KL730 to USB Boot Mode.
-
For upgrading KL730 to Flash boot mode, please refer Upgrade KL730 to Flash Boot Mode.
-
For writing model into KL730, please refer Write Model Into KL730.
1.7 Device FIFO Queue Config Example
This example is to show how to configure the kp_ddr_manage_attr_t and the usage of kp_store_ddr_manage_attr().
Please refer Device DDR Management for more information.
$ sudo ./kl520_demo_generic_image_inference_fifoq_configconnect device ... OK
upload firmware ... OK
store attribute ... OK
upload model ... OK
read image ... OK
starting inference loop 10 times:
..........
inference loop is done
number of output node : 2
node 0:
width: 7:
height: 7:
channel: 255:
number of data (float): 12495:
first 20 data:
1.359, 0.340, 0.510, -0.510, 0.170, 0.340,
-0.849, 0.849, 0.849, 0.510, 0.679,
0.679, 0.679, 0.510, 0.000, 0.340,
0.510, 0.510, 0.340, 0.000,
node 1:
width: 14:
height: 14:
channel: 255:
number of data (float): 49980:
first 20 data:
0.874, -0.349, -0.175, 0.000, 0.000, -0.175,
0.175, 0.349, -0.175, 0.175, -0.175,
0.000, -0.175, -0.699, 1.398, 1.048,
1.048, 0.874, 0.524, 0.699,
dumped node 0 output to 'output_bike_cars_street_224x224_node0_7x7x255.txt'
dumped node 1 output to 'output_bike_cars_street_224x224_node1_14x14x255.txt'1.8 Get Model Information Example
This example demonstrates how to use kp_load_model_from_file() to parse the NEF file and retrieve model information from the NEF descriptor kp_model_nef_descriptor_t. This tool allows you to quickly probe the model metadata.
$ sudo ./model_information -port 25 -target KL520 -model ../../res/models/KL520/tiny_yolo_v3/models_520.nef-h : help
-target : [target platform] (KL520, KL720, KL630, KL730) = KL520
-port : [port id set] = 25 (all, auto or specified port id set, can also be "13,537" for multiple devices)
-model : [model file path] (.nef) = ../../res/models/KL520/tiny_yolo_v3/models_520.nef
connect device ... OK
upload firmware ... OK
upload model from usb ... OK
=======================================================
[nef metadata]
=======================================================
target: KL520
crc: 0x6CBF1FF9
num_models: 1
=======================================================
kn_num: 0
toolchain_version: kneron_compiler version: 2024-12-02(7b261fd55a)/kneron_nef_utils version: 2025-01-07(d9ea70a);
compiler_version:
nef_schema_version: 0.0.1
platform:
=======================================================
[Model #0]
=======================================================
target: KL520
version: 0x1
id: 19
setup_bin_schema_version: 0.0.0
file_schema_version: 0.0.0
=======================================================
[input node]
=======================================================
index: 0
name:
data_layout: 4W4C8B
quantization parameter version: 1
quantized_axis: 1
quantization_parameter[0]: scale 1.000000 radix 8
input shape npu: [ 1, 3, 224, 224]
input shape onnx: [ 1, 3, 224, 224]
input axis permutation onnx to npu: [ 0, 1, 2, 3]
=======================================================
[output node]
=======================================================
index: 0
name:
data_layout: 16W1C8B
quantization parameter version: 1
quantized_axis: 1
quantization_parameter[0]: scale 1.471767 radix 2
output shape npu: [ 1, 255, 7, 7]
output shape onnx: [ 1, 255, 7, 7]
output axis permutation onnx to npu: [ 0, 1, 2, 3]
=======================================================
index: 1
name:
data_layout: 16W1C8B
quantization parameter version: 1
quantized_axis: 1
quantization_parameter[0]: scale 1.430706 radix 2
output shape npu: [ 1, 255, 14, 14]
output shape onnx: [ 1, 255, 14, 14]
output axis permutation onnx to npu: [ 0, 1, 2, 3]
=======================================================2. Inference API Examples
Kneron PLUS provides three different API set for inference:
- Generic Inference
- Generic Image Inference
- Generic Data Inference
- Customized Inference
- User Defined API Inference
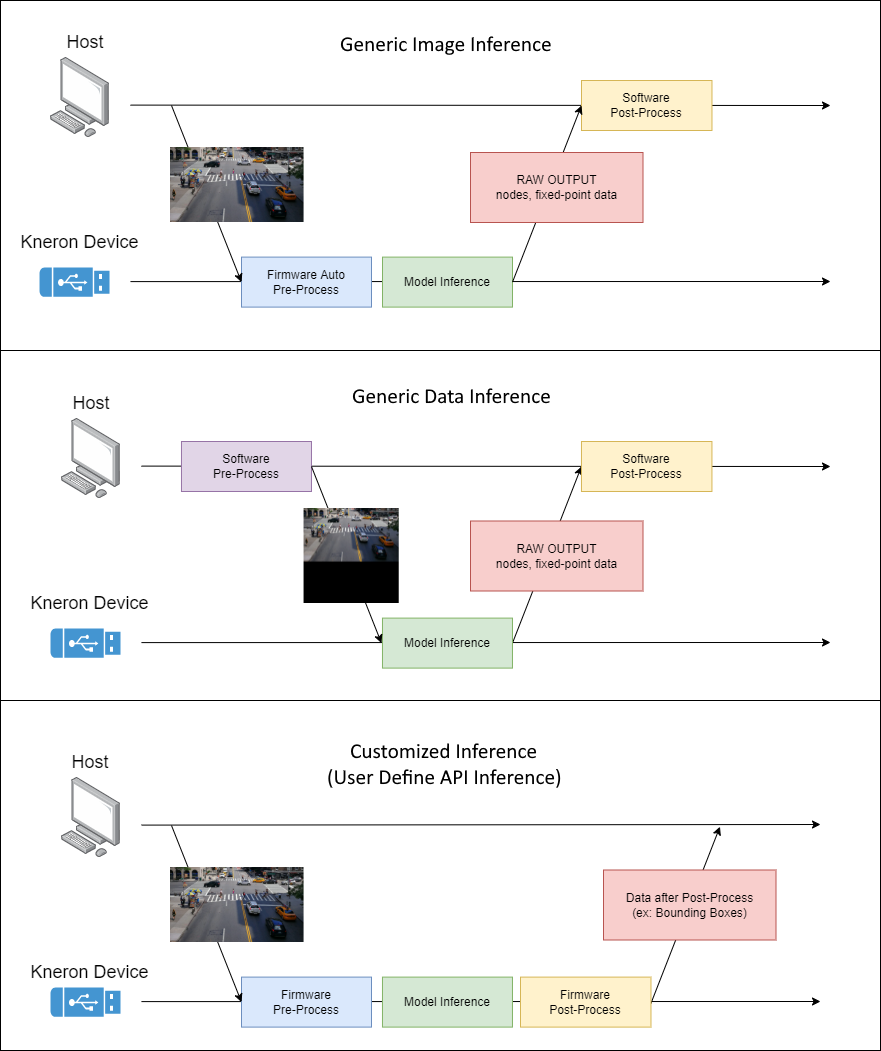
The main difference between Generic Inference and Customized Inference is shown below:
-
Generic Image Inference:
- Input: Image
- Pre-process: Auto Hardware Pre-process on Device
- Post-process: None on Device
-
Generic Data Inference:
- Input: Data (Absolutely aligned model input)
- Pre-process: None on Device
- Post-process: None on Device
-
Customized Inference:
- Input: Image or Data (Based on pre-process user defined on device)
- Pre-process: User Developed Pre-process, Auto Hardware Pre-process, or None on Device
- Post-process: User Developed Post-process, or None on Device
2.1 Generic Inference Example
Generic Inference includes two sets of APIs, Generic Image Inference API and Generic Data Inference API.
For the detail introduction, please refer the documents in Generic Inference.
Note: Multiple calls of kp_app_yolo_inference_send() without any call of kp_app_yolo_inference_receive() may cause the system stuck.
2.2 Customized Inference Example
Customized inference examples are using the Customized Inference API, which provides some decent flexibility for users to customize their own applications with customized NEF models.
For the detail introduction of Customized Inference, please refer the documents in Customize API section.
2.3 User Define API Inference Example
Although Customized Inference may provide some flexibility, fill the header used in Customized Inference API may not be easy for general users. Therefore, if you wish to provide simple APIs to your users, User Define API will be your best choice.
User Define API supposed to be a simple API function which is composed by those things you need to do under Customized Inference. Not only user defined inference send and receive can be created by User Define API, but also user defined command can be joined by User Define API.
The kl520_demo_user_define_api is to show you how to use the User Define API:
-
For inference:
kp_app_yolo_inference_send()andkp_app_yolo_inference_receive(). -
For command:
kp_app_yolo_get_post_proc_parameters()andkp_app_yolo_get_post_proc_parameters().
All these 4 API functions are implemented by Customized API, please refer the documents in Customize API section for more information.
Note: Multiple calls of kp_app_yolo_inference_send() without any call of kp_app_yolo_inference_receive() may cause the system stuck.
$ sudo ./kl520_demo_user_define_apiconnect device ... OK
upload firmware ... OK
upload model ... OK
get post-process parameters ... OK
set post-process parameters ... OK
read image ... OK
starting inference loop 100 times:
...........................................................
recover post-process parameters ... OK
detectable class count : 80
box count : 2
Box 0 (x1, y1, x2, y2, score, class) = 44.7, 57.0, 92.7, 195.5, 0.965018, 0
Box 1 (x1, y1, x2, y2, score, class) = 121.8, 68.4, 218.3, 184.7, 0.997959, 2
output bounding boxes on 'output_bike_cars_street_224x224.bmp'3. Parallel Usage Control Examples
3.1 Multiple Threads Usage Example
Note: This example is only provided in Kneron PLUS v1.3.0 and above.
In the previous inference related examples, sending images to device and receiving results from device are running sequentially.
However, sending images and receiving results can be done in different threads to maximum the processing speed.
The kl520_demo_generic_inference_multithread is an example for showing how to put sending image to device and receiving results from device into two different threads.
$ sudo ./kl520_demo_generic_inference_multithreadconnect device ... OK
upload firmware ... OK
upload model ... OK
read image ... OK
starting inference loop 100 times:
....................................................................................................
number of output node : 2
node 0:
width: 7:
height: 7:
channel: 255:
number of data (float): 12495:
first 20 data:
1.359, 0.340, 0.510, -0.510, 0.170, 0.340,
-0.849, 0.849, 0.849, 0.510, 0.679,
0.679, 0.679, 0.510, 0.000, 0.340,
0.510, 0.510, 0.340, 0.000,
node 1:
width: 14:
height: 14:
channel: 255:
number of data (float): 49980:
first 20 data:
0.874, -0.349, -0.175, 0.000, 0.000, -0.175,
0.175, 0.349, -0.175, 0.175, -0.175,
0.000, -0.175, -0.699, 1.398, 1.048,
1.048, 0.874, 0.524, 0.699,
dumped node 0 output to 'output_bike_cars_street_224x224_node0_7x7x255.txt'
dumped node 1 output to 'output_bike_cars_street_224x224_node1_14x14x255.txt'
total inference 100 images
time spent: 2.00 secs, FPS = 50.03.2 Drop Frame Usage Example
Note: This example is only provided in Kneron PLUS v1.3.0 and above.
This example belongs to OpenCV examples. Please build Kneron PLUS with OpenCV.
If the camera produces frames faster than device inference, displaying frames from camera may be delayed by the inference speed since sending image to device may be blocked when buffer of device is full.
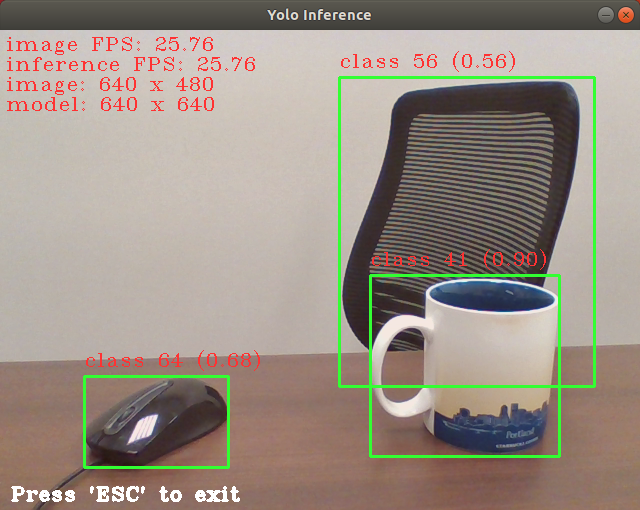
kl720_demo_cam_generic_inference_drop_frame is an example for showing how to use kp_inf_configuration_t and kp_inference_configure() config device to drop frame if the buffer is full.
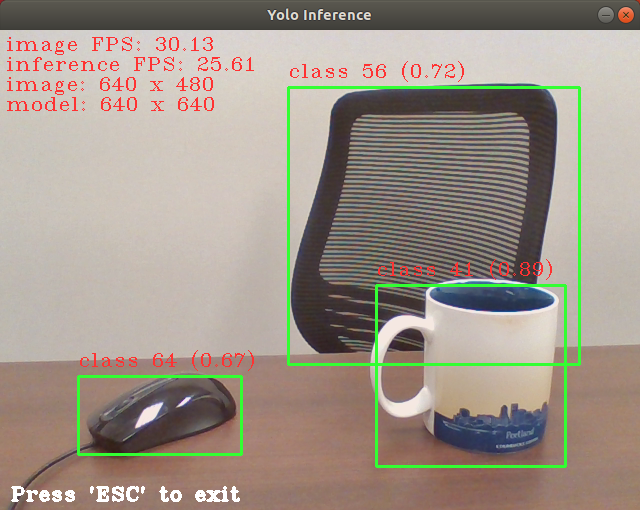
The image display FPS raised from 25.76 (without drop frame) to 30.13 (with drop frame).
4. Model Zoo Examples
Model Zoo examples simply show one image inference via different pre-trained models.
The model backbones are available and could be retrained for specific need.
Please refer to Model Zoo section for more information.
$ sudo ./kl720_kn-model-zoo_generic_inference_post_yolov5connect device ... OK
upload model ... OK
read image ... OK
starting inference loop 1 times:
.
inference loop is done
detectable class count : 80
box count : 18
Box 0 (x1, y1, x2, y2, score, class) = 371.0, 354.0, 510.0, 747.0, 0.805185, 0
Box 1 (x1, y1, x2, y2, score, class) = 742.0, 60.0, 794.0, 211.0, 0.515536, 0
Box 2 (x1, y1, x2, y2, score, class) = 87.0, 31.0, 135.0, 76.0, 0.265722, 0
Box 3 (x1, y1, x2, y2, score, class) = 89.0, 189.0, 121.0, 300.0, 0.208385, 0
Box 4 (x1, y1, x2, y2, score, class) = 373.0, 516.0, 480.0, 763.0, 0.528667, 1
Box 5 (x1, y1, x2, y2, score, class) = 139.0, 146.0, 474.0, 449.0, 0.805632, 2
Box 6 (x1, y1, x2, y2, score, class) = 458.0, 149.0, 719.0, 346.0, 0.762070, 2
Box 7 (x1, y1, x2, y2, score, class) = 173.0, 2.0, 319.0, 94.0, 0.731227, 2
Box 8 (x1, y1, x2, y2, score, class) = 706.0, 186.0, 799.0, 489.0, 0.726494, 2
Box 9 (x1, y1, x2, y2, score, class) = 95.0, 117.0, 290.0, 315.0, 0.717568, 2
Box 10 (x1, y1, x2, y2, score, class) = 244.0, 44.0, 407.0, 163.0, 0.661910, 2
Box 11 (x1, y1, x2, y2, score, class) = 428.0, 115.0, 623.0, 233.0, 0.656740, 2
Box 12 (x1, y1, x2, y2, score, class) = 37.0, 79.0, 175.0, 277.0, 0.581318, 2
Box 13 (x1, y1, x2, y2, score, class) = 0.0, 53.0, 33.0, 156.0, 0.493920, 2
Box 14 (x1, y1, x2, y2, score, class) = 24.0, 79.0, 132.0, 212.0, 0.245957, 2
Box 15 (x1, y1, x2, y2, score, class) = 319.0, 0.0, 449.0, 152.0, 0.303165, 7
Box 16 (x1, y1, x2, y2, score, class) = 235.0, 43.0, 410.0, 161.0, 0.226067, 7
Box 17 (x1, y1, x2, y2, score, class) = 0.0, 636.0, 62.0, 686.0, 0.206850, 8
output bounding boxes on 'output_one_bike_many_cars_800x800.bmp'5. Debug Related Examples
5.1 Debug Flow Example
Note: This feature and example are only provided in Kneron PLUS v1.3.0 and above.
This example is to demonstrate the usage of kp_dbg_set_enable_checkpoints() and kp_dbg_receive_checkpoint_data(). And the diagram below shows the flow of this two APIs for single model usage.
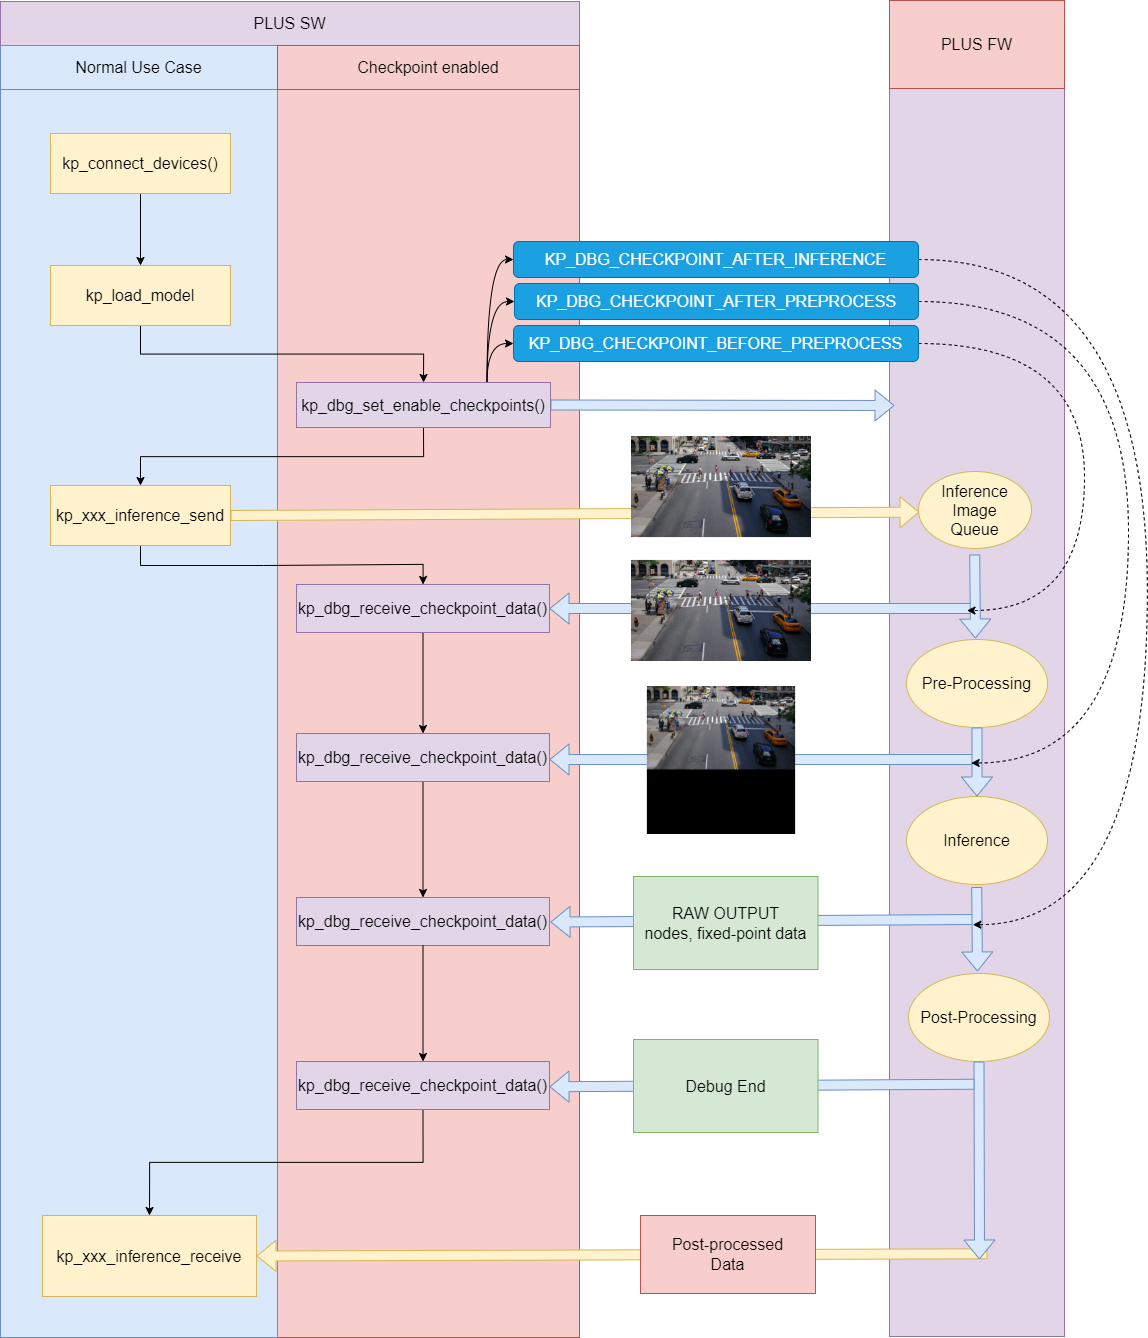
There are three check points can be set by kp_dbg_set_enable_checkpoints():
- KP_DBG_CHECKPOINT_BEFORE_PREPROCESS
- KP_DBG_CHECKPOINT_AFTER_PREPROCESS
- KP_DBG_CHECKPOINT_AFTER_INFERENCE
If KP_DBG_CHECKPOINT_BEFORE_PREPROCESS is set, the image sent by `kp_xxx_inference_send() will be retrieved by kp_dbg_receive_checkpoint_data().
If KP_DBG_CHECKPOINT_AFTER_PREPROCESS is set, the image which has been performed pre-process will be retrieved by kp_dbg_receive_checkpoint_data().
If KP_DBG_CHECKPOINT_AFTER_INFERENCE is set, the raw output data of the model will be retrieved by kp_dbg_receive_checkpoint_data().
After all debug data have been retrieved, kp_dbg_receive_checkpoint_data() will receive data with status KP_DBG_CHECKPOINT_END_37 to notify the debug process has finished.
Note: If you are using multiple models, kp_dbg_receive_checkpoint_data() may need to be called more times than the diagram shows.
$ sudo ./kl520_demo_customize_inf_single_model_debugconnect device ... OK
upload firmware ... OK
upload model ... OK
read image ... OK
debug enable checkpoints ... OK
send one image for inference ... OK
before-pre_process data:
image x, y = (0, 0)
image width, height = (800, 800)
img_format = 0x60 (kp_image_format_t)
inference model ID = 19
image data (hex) = 0x 3D.E7.3D.E7.3D.E7.3D.E7.3C.E7 ...
after-pre_process data:
image width, height = (224, 224)
img_format = 0xd (kp_image_format_t)
inference model ID = 19
image data (hex) = 0x 60.64.68.00.60.64.63.00.60.64 ...
before-cpu data:
inference model ID = 19
total raw output size = 14336 bytes
number of nodes = 1
node 0:
- width = 7
- height = 7
- channel = 128
- radix = 3
- scale = 1.667
- npu data layout = 16W1C8B
raw output (hex) = 0x FF.FD.FD.FE.FF.00.15.0B.FE.FF ...
after-cpu data:
inference model ID = 19
total raw output size = 28672 bytes
number of nodes = 1
node 0:
- width = 14
- height = 14
- channel = 128
- radix = 2
- scale = 1.667
- npu data layout = 16W1C8B
raw output (hex) = 0x FF.FF.FD.FD.FD.FD.FE.FE.FF.FF ...
after-inference data:
inference model ID = 19
total raw output size = 85680 bytes
number of nodes = 2
node 0:
- width = 7
- height = 7
- channel = 255
- radix = 2
- scale = 1.472
- npu data layout = 16W1C8B
node 1:
- width = 14
- height = 14
- channel = 255
- radix = 2
- scale = 1.431
- npu data layout = 16W1C8B
raw output (hex) = 0x 0A.01.00.FE.FE.FE.FA.0C.FA.FC ...
got the end of debug loop ... OK
receive inference result ... OK5.2 Execution Time Profiling Example
Note: This feature and example are only provided in Kneron PLUS v1.3.0 and above.
This example is to demonstrate the usage of kp_profile_set_enable() and kp_profile_get_statistics(). And the diagram below shows the flow of this two APIs for single model usage.
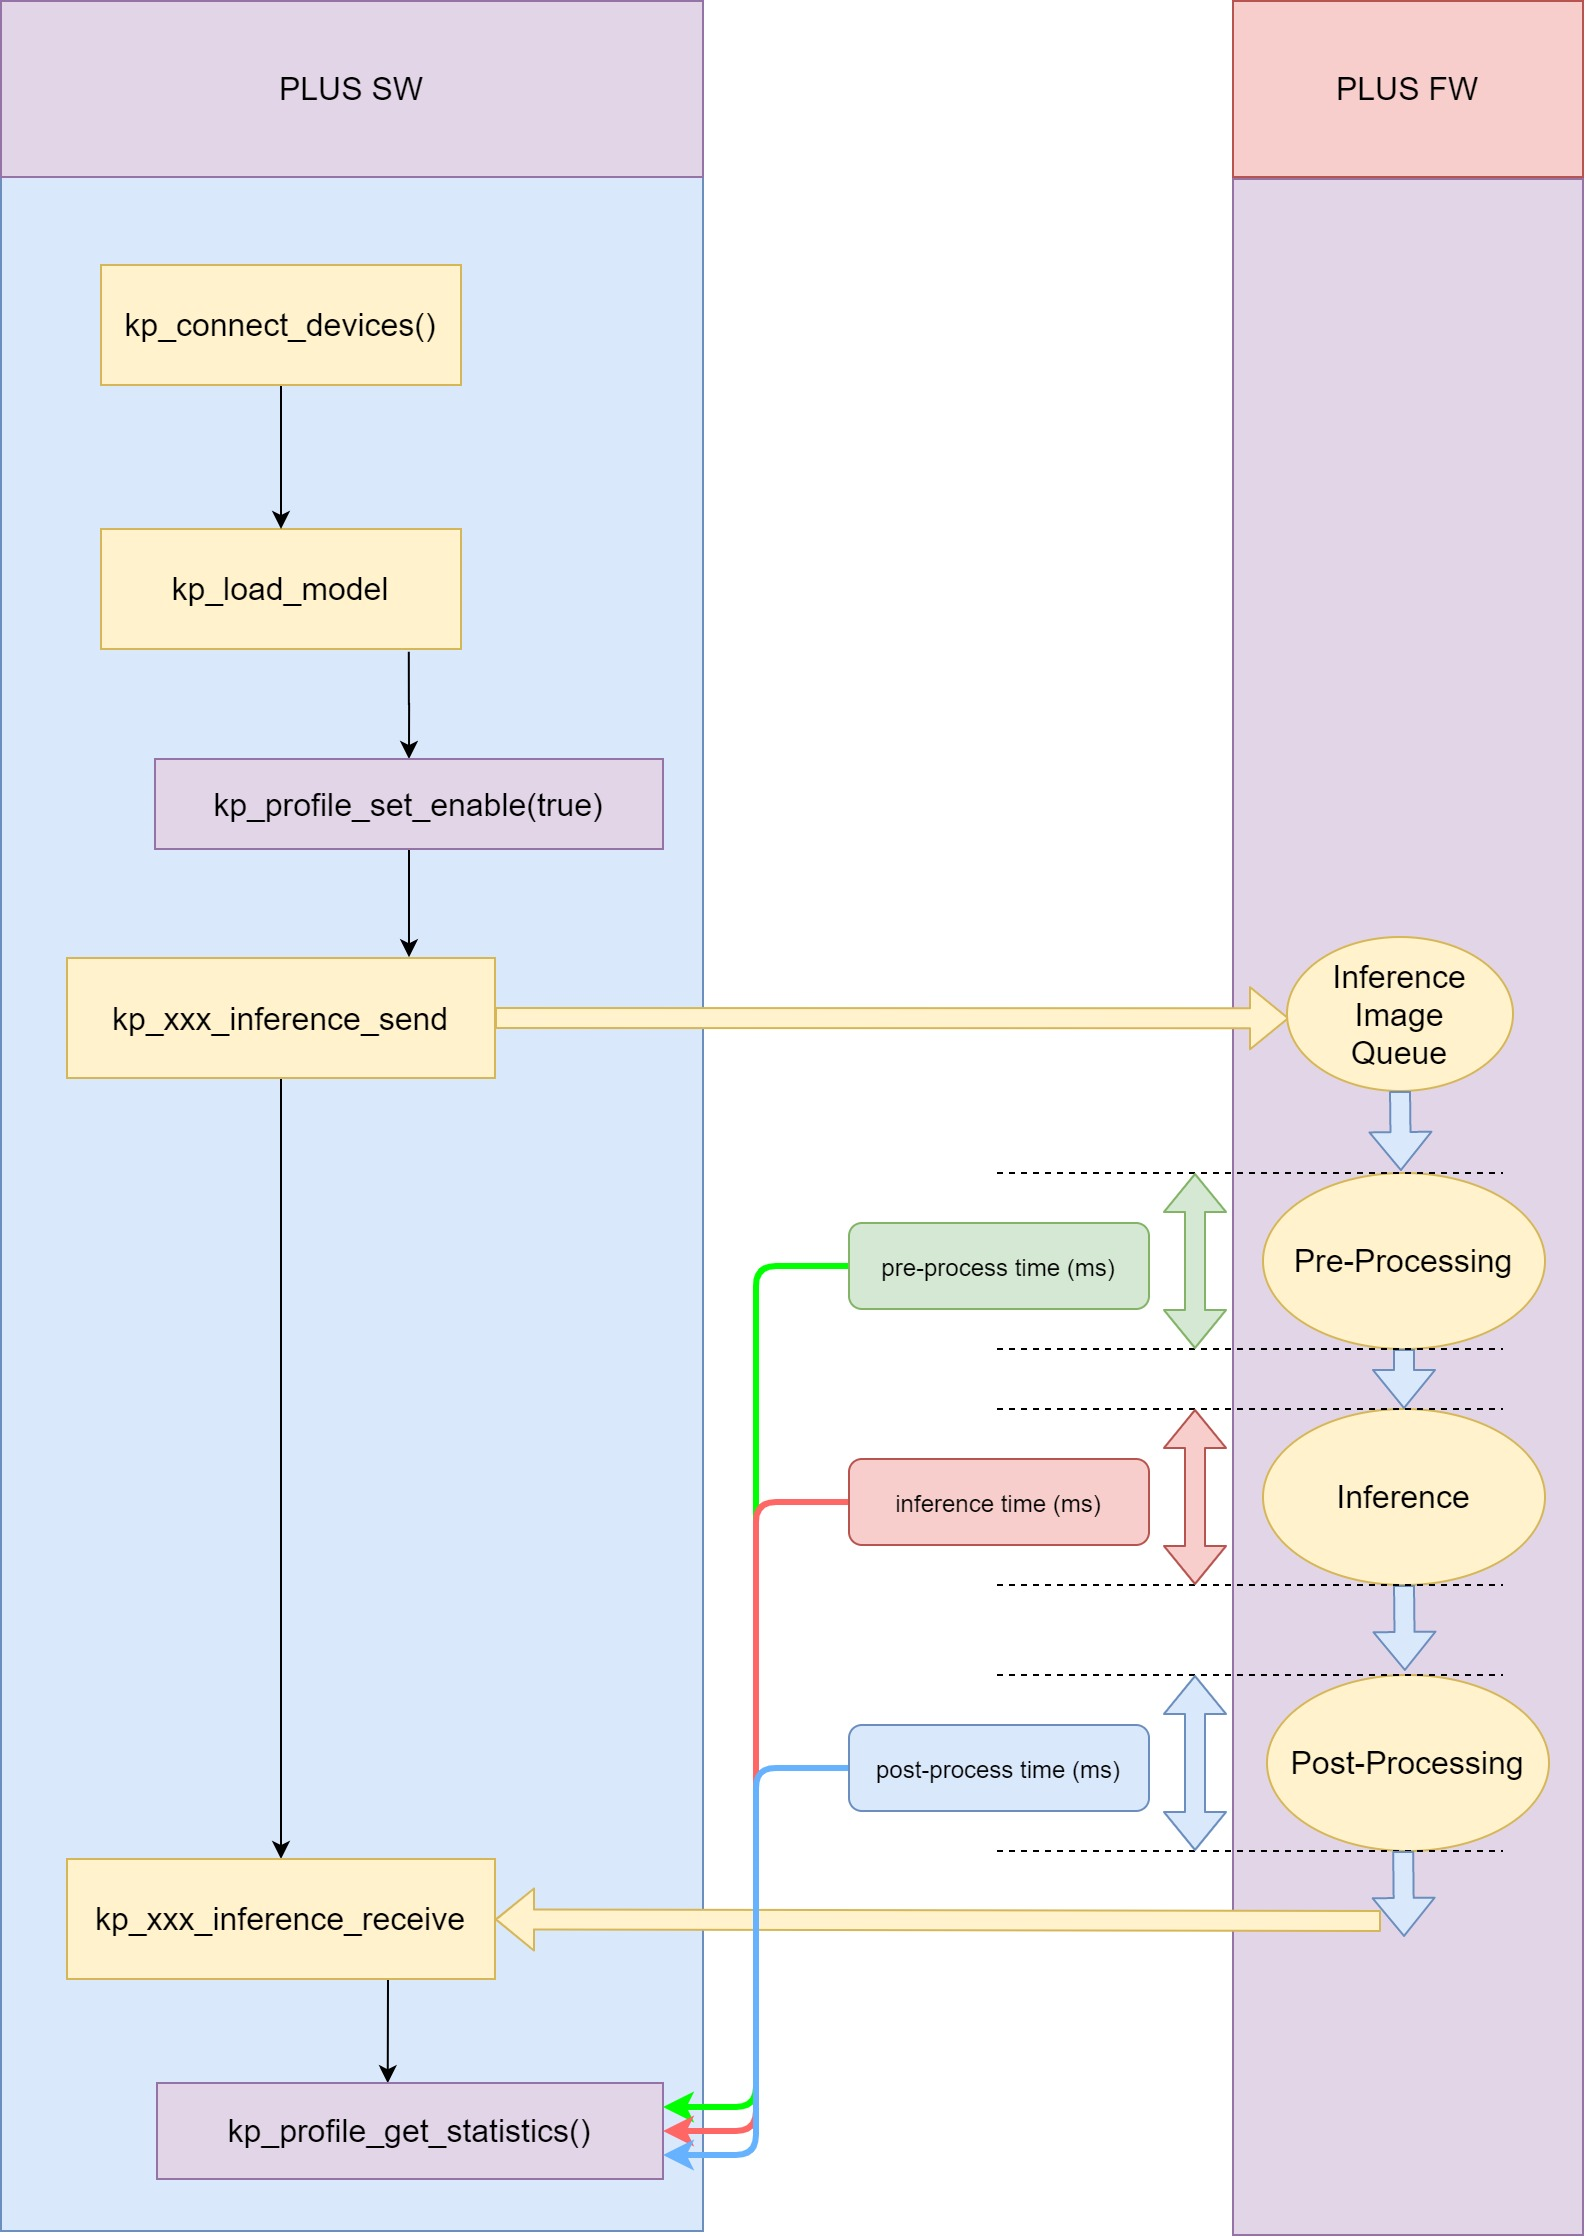
Unlike Debug Flow, kp_profile_get_statistics() does not need to be called between kp_xxx_inference_send() and kp_xxx_inference_receive(). It only needs to be call after one or more inferences are completed.
Therefore, kp_xxx_inference_send() and kp_xxx_inference_receive() can be called multiple times between kp_profile_set_enable() and kp_profile_get_statistics().
The pre-process time, inference time, and post-process time are the sum of these time in each inference.
$ ./kl520_demo_customize_inf_single_model_profileconnect device ... OK
upload firmware ... OK
upload model ... OK
read image ... OK
enable profile ... OK
starting inference loop 100 times:
......................................................
inference loop completed.
[profile]
number of models: 1
- model_id = 19
- inf_count = 100
- cpu_op_count = 1
- avg_pre_process_ms = 1.31
- avg_inference_ms = 18.00
- avg_cpu_op_ms = 1.00
- avg_cpu_op_per_cpu_node_ms = 1.00
- avg_post_process_ms = 2.00
detectable class count : 80
box count : 6
Box 0 (x1, y1, x2, y2, score, class) = 44.7, 57.0, 92.7, 195.5, 0.965018, 0
Box 1 (x1, y1, x2, y2, score, class) = 42.7, 94.5, 99.9, 210.8, 0.465116, 1
Box 2 (x1, y1, x2, y2, score, class) = 121.8, 68.4, 218.3, 184.7, 0.997959, 2
Box 3 (x1, y1, x2, y2, score, class) = 86.8, 83.5, 130.9, 117.9, 0.499075, 2
Box 4 (x1, y1, x2, y2, score, class) = 27.7, 77.4, 55.1, 100.0, 0.367952, 2
Box 5 (x1, y1, x2, y2, score, class) = 1.1, 83.7, 49.8, 180.9, 0.229727, 2
output bounding boxes on 'output_bike_cars_street_224x224.bmp'